Why You'll Love It
- - No oven needed, perfect for hot days
- - Creamy peanut butter filling feels indulgent yet light
- - Crunchy crust offers satisfying contrast
- - Simple pantry ingredients keep costs low
*I made this for a family gathering and it vanished in minutes—pure comfort in a slice.*
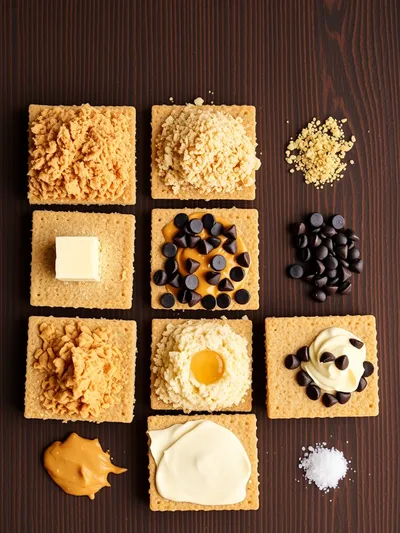
Essential Ingredient Guide
- Peanut butter: Choose a natural, unsweetened variety for depth; it provides the rich, nutty backbone of the pie.
- Graham crackers: Look for whole‑grain crackers for a buttery flavor and sturdy base; crush them finely.
- Chocolate chips: Melted dark chocolate adds a glossy finish and a slight bitterness to balance the sweet.
- Heavy cream: Whipped into soft peaks, it lightens the filling and creates a silky texture.
- Lemon juice: A splash brightens the richness, cutting through the butteriness.
- Maple syrup: Adds natural sweetness and a hint of caramel without overpowering the peanut flavor.
Complete Cooking Process
-
Ingredient Readiness:
Gather all pantry items, crush the crackers, and let the cream sit at room temperature for smoother folding.
-
Flavor Development:
Mix the peanut butter with syrup and lemon; the acidity awakens the nutty aroma.
-
Texture Control:
Fold the whipped cream gently to keep the filling airy while maintaining its body.
-
Finishing Touches:
Drizzle melted chocolate over the top and sprinkle a pinch of sea salt for contrast.
-
Serving Timing:
Chill for at least two hours so the crust sets and flavors meld before serving.
- Press the crust firmly to avoid cracks.
- Use a piping bag for an even chocolate swirl.
- Top with toasted peanuts for extra crunch.
- Keep the pie covered while chilling to prevent a skin.
Pro Tips
Well, these little adjustments make the difference between a good dessert and a memorable one. I remember slipping a slice onto a plate and watching the chocolate melt slightly as the room warmed, and that moment felt like a quiet celebration. So, take your time, enjoy the process, and let the aroma guide you.
The essence of the dish:
A fun fact or historical angle:
Flavor or sensory focus:
You Must Know
- The crust must be tightly packed.
- Do not over‑whip the cream.
- Serve chilled for optimal texture.
Frequently Asked Questions
→ Can I use creamy peanut butter instead of natural?
Yes, but a natural variety keeps the sweetness balanced; creamy can be a bit oily.
→ What if I don’t have graham crackers?
You can substitute with vanilla wafers or digestive biscuits; just crush finely.
→ How long can the pie stay refrigerated?
It stays fresh for up to three days, covered tightly.
→ Can I add a fruit topping?
A few sliced bananas or fresh berries complement the peanut butter nicely.
→ Is it gluten‑free?
Swap graham crackers for a gluten‑free cookie blend and you’re good.
→ Will the chocolate melt at room temperature?
It will soften slightly, but keeping the pie chilled prevents it from fully melting.
Chef's Tips
Ensure the crust is compact; otherwise, it may crumble when sliced.,Do not over‑beat the cream to keep the filling light.,Adjust the amount of maple syrup for a sweeter or milder taste.
Nutrition Facts
per serving
320
Calories
8g
Protein
22g
Carbs
22g
Fat
Taste Profile
Nutty‑sweet with a buttery depth
Ingredient Substitutions
Don't have an ingredient? Try these alternatives
Flavor will change subtly; keep the same quantity.
Provides a dairy‑free option but adds a coconut note.
Recipe Variations
Try these delicious twists on the original
Spicy Version
Add a pinch of cayenne pepper to the filling and drizzle with a hint of chocolate mixed with chili oil.
Mediterranean Style
Stir in chopped toasted almonds and a drizzle of honey for a sweet‑nutty twist.
Common Mistakes to Avoid
Learn from others' mistakes for perfect results
- Skipping the chilling step leaves the crust crumbly.
- Over‑whipping the cream makes the filling too stiff.
- Using too much chocolate leads to a soggy top.
Meal Prep & Storage
Make Ahead Tips
You can prepare the crust and filling up to 24 hours ahead; keep them separate and combine just before chilling.
Leftover Ideas
Refrigerate leftovers in an airtight container; enjoy within three days for best texture.
Perfect Pairings
Serve this with...
Cooking Timeline
Prepare crust: crush crackers and combine with butter and sugar.
Press crust into pan and set aside while preparing filling.
Mix filling ingredients, fold in cream, spread over crust.
Add chocolate drizzle and sea salt; refrigerate.
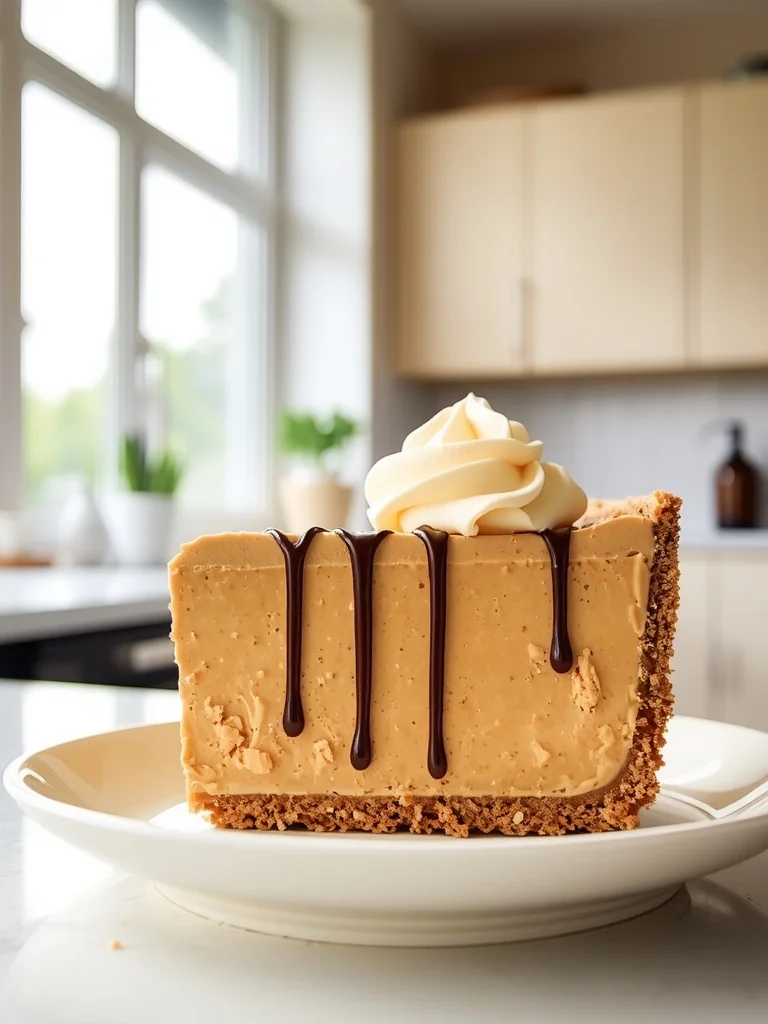
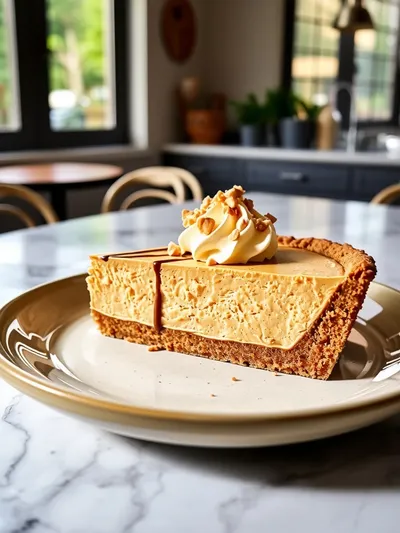
No Bake Peanut Butter Pie – Graham Cracker Crust
Enjoy a silky, no bake peanut butter pie with a crunchy graham cracker crust—quick, creamy, and perfect for a satisfying dessert.
Timing
Prep Time
15 Minutes
Cook Time
0 Minutes
Total Time
15 Minutes
Recipe Details
Ingredients
Crust
- 01 1 ½ cups graham cracker crumbs
- 02 3 tbsp melted butter
- 03 2 tbsp sugar
Filling
- 01 1 cup natural peanut butter
- 02 ¼ cup maple syrup
- 03 2 tbsp lemon juice
- 04 ½ cup heavy cream, softened
- 05 ¼ cup dark chocolate chips, melted
Topping
- 01 2 tbsp dark chocolate chips, melted
- 02 Pinch of sea salt
Instructions
Combine the graham cracker crumbs, melted butter, and sugar in a bowl; press the mixture firmly into the bottom of a 9‑inch pie pan to form an even crust.
In a separate bowl, whisk together the peanut butter, maple syrup, and lemon juice until smooth and glossy.
Fold the softened heavy cream into the peanut butter mixture gently, preserving the airy texture.
Spread the filling over the prepared crust, smoothing the top with a spatula.
Drizzle the melted chocolate over the surface and sprinkle a pinch of sea salt; let it set for a few minutes.
Refrigerate the pie for at least two hours before slicing and serving.
Notes & Tips
- 1 Ensure the crust is compact; otherwise, it may crumble when sliced.
- 2 Do not over‑beat the cream to keep the filling light.
- 3 Adjust the amount of maple syrup for a sweeter or milder taste.
Tools You'll Need
-
9‑inch pie pan
-
Mixing bowls
-
Hand mixer or whisk
-
Rubber spatula
-
Measuring cups and spoons
Must-Know Tips
- Don't forget to chill the crust before adding the filling; it helps set the base.
- Let the chocolate cool slightly before drizzling to avoid melting the filling.
- Taste the filling before chilling; add a dash more lemon if you like a brighter note.
Professional Secrets
- Room temperature butter for the crust ensures it binds evenly.
- Folding in whipped cream creates a mousse‑like lightness without heavy mixers.
- A quick chill after adding chocolate prevents bloom and keeps the shine.
Recipe by
NicoleJane Doe is the culinary heart and voice behind Your Website, a vibrant personal blog that celebrates home‑cooked goodness for the modern American kit ...
Get Delicious Recipes Weekly
Join 25,000+ home cooks getting our best recipes straight to their inbox.
Free forever • No spam • Unsubscribe anytime